How to Record Your iPhone Screen: Quick and Easy!
Are you looking to record your iPhone screen? Maybe you want to create a tutorial, capture a moment in a game, or show someone how to perform a task. Whatever your reason, recording your iPhone screen is easier than you might think. In this step-by-step guide, we’ll show you how to record your iPhone screen.
Step 1: Add Screen Recording to Your Control Center
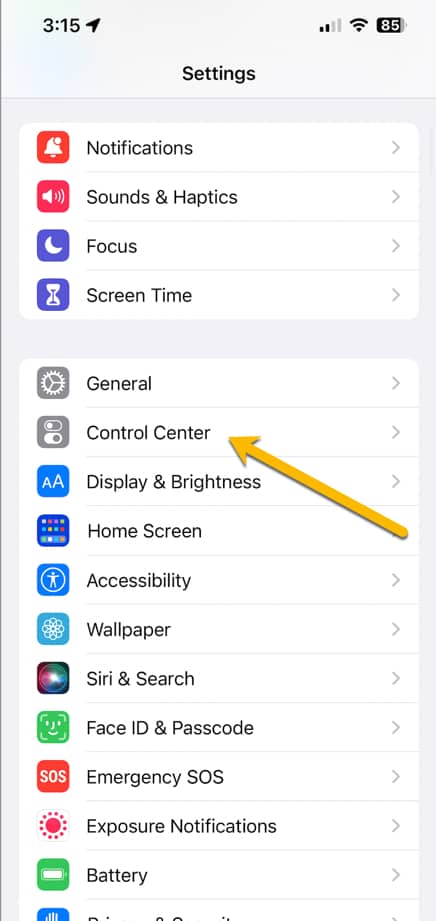
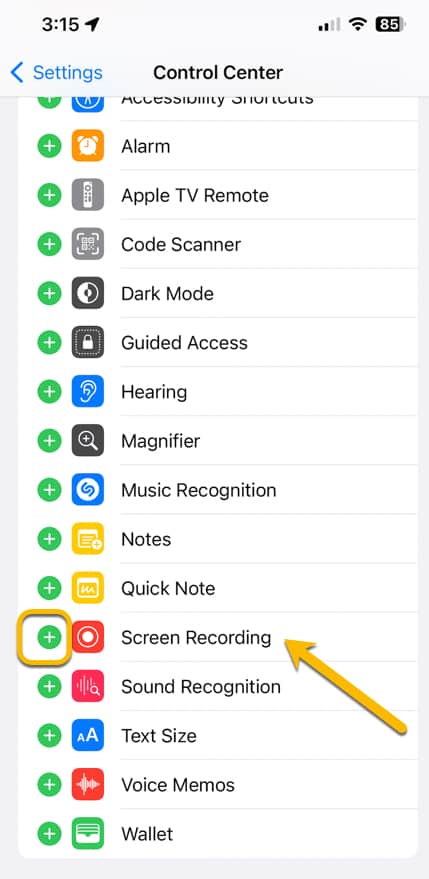
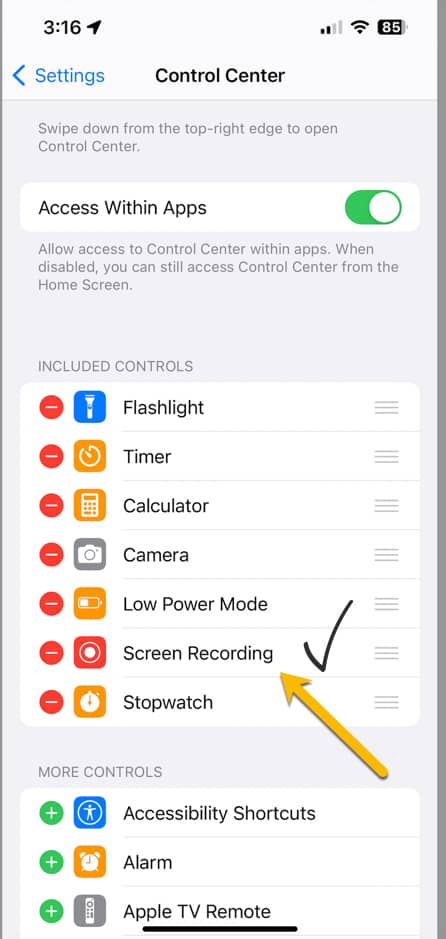
First, you’ll need to make sure that Screen Recording is added to your Control Center. To do this, go to Settings > Control Center > Customize Controls. Then, find Screen Recording and tap the green plus sign to add it to your Control Center.
Step 2: Open Control Center and Start Recording
Once you’ve added Screen Recording to your Control Center, you can access it by swiping up from the bottom of your iPhone screen. Then, tap the Screen Recording icon, which looks like a circle inside another circle.
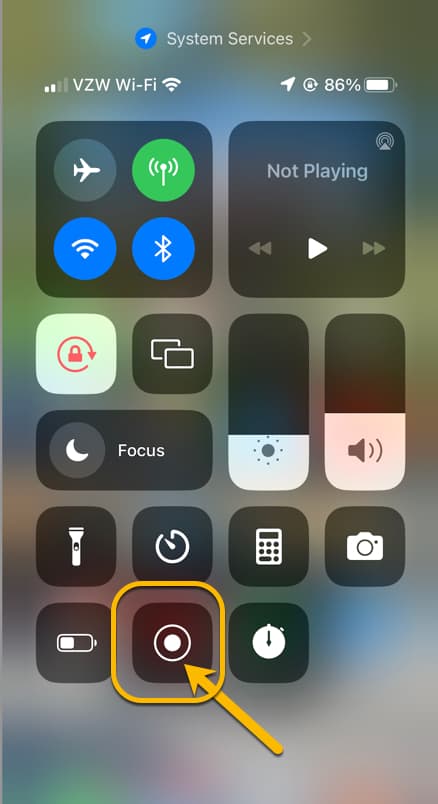
Step 3: Customize Your Recording
Before you start recording, you can customize a few settings. To do this, press and hold the Screen Recording icon. This will bring up a menu where you can turn on or off the microphone, choose to record the screen only or screen and audio, and set the recording quality.
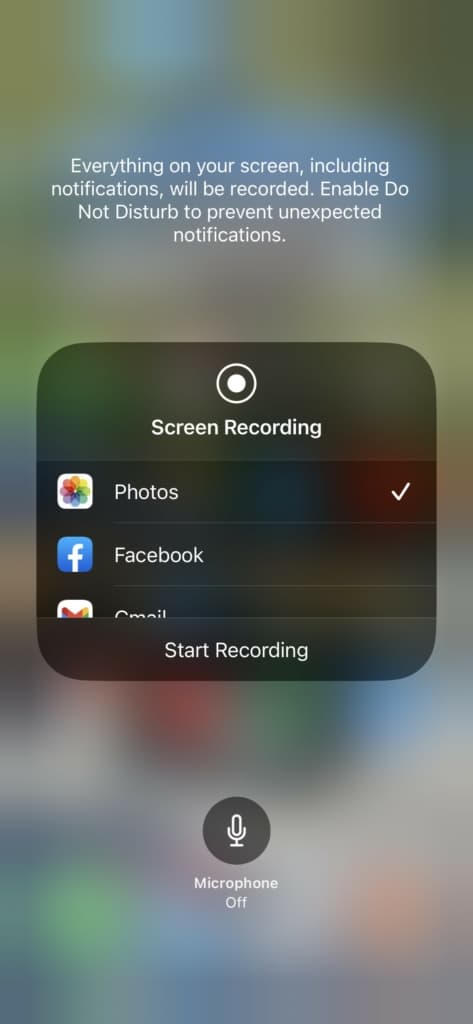
Step 4: Start Recording
When you’re ready to start recording, simply tap the red record button. You’ll have a three-second countdown before the recording starts, so make sure you’re ready. While recording, a red bar will appear at the top of your screen to let you know that you’re recording.
Step 5: Stop Recording
When you’re finished recording, simply tap the red bar at the top of your screen. A message will appear asking if you want to stop the recording. Tap Stop, and the recording will be saved to your Photos app.
Step 6: Edit and Share Your Recording
Once you’ve finished recording, you can edit your video in the Photos app. Trim the video, add filters, or use other editing tools to make your recording look just the way you want it. When you’re finished, you can share your recording with others via text, email, or social media.
That’s it! Recording your iPhone screen is a simple and easy process that can be done in just a few steps. Whether you’re creating a tutorial or just capturing a moment, Screen Recording on your iPhone is a valuable tool that can help you share your content with others.
✅ Recommended Article: Why won’t my phone send pictures through text?
Ways People Use The iPhone Screen Record Feature
The screen record feature on an iPhone can be incredibly useful for a variety of reasons. Here are some of the things you can use it for:
- Creating tutorials: If you’re an educator, business owner, or content creator, you can use the screen record feature to create tutorials and how-to videos for your audience. You can demonstrate how to use a particular app, perform a task on your iPhone, or explain a complex concept.
- Capturing gameplay: If you’re a gamer, you can use the screen record feature to capture gameplay footage. This can be especially useful if you want to share your gameplay with others or create a YouTube channel dedicated to gaming.
- Sharing moments: The screen record feature can be a great way to capture and share special moments with friends and family. Whether you’re capturing a funny conversation with your friends or recording your child’s first steps, the screen record feature can help you preserve these memories.
- Troubleshooting: If you’re experiencing issues with your iPhone, you can use the screen record feature to record the problem and share it with tech support. This can make it easier for them to diagnose and fix the issue.
- Creating content: The screen record feature can be a valuable tool for content creators. You can record yourself using a particular app, showcasing a product, or providing commentary on a topic. This can be a great way to build your audience and establish yourself as an expert in your field.
Overall, the screen record feature on an iPhone is a versatile tool that can be used in a variety of ways. Whether you’re creating content, troubleshooting issues, or simply capturing special moments, the screen record feature can help you get the job done.
Limitations of the screen record feature on an iPhone
While the feature is incredibly useful, there are a few things that you should be aware of:
- Recording limitations: The screen record feature on an iPhone has some limitations when it comes to recording. For example, you can’t record phone calls or FaceTime calls, and there are certain apps that won’t allow you to record their content.
- Audio limitations: When recording your screen, you have the option to include audio from your microphone or from your device. However, if you choose to record audio from your device, it won’t capture system sounds or audio from other apps that are playing in the background.
- Battery life: Recording your screen can drain your iPhone’s battery life. If you’re planning to record for an extended period of time, make sure you have enough battery life to last.
- Storage limitations: Video files can take up a lot of storage space on your iPhone. Make sure you have enough storage available before you start recording.
- Third-party apps: While the screen record feature is built-in to your iPhone, there are also third-party apps that offer more advanced features. These apps can provide better quality recordings or allow you to customize your settings.
By understanding the limitations of the screen record feature on an iPhone, you can better plan and prepare for your recording needs. While there may be some limitations, the feature is still a powerful tool that can help you create content, troubleshoot issues, and capture special moments.
How To Screen Record On Older iPhone Models
Here’s an overview of how to use the screen record feature on some popular iPhone models:
- iPhone X and later: Swipe down from the upper-right corner of the screen to access Control Center. Then, tap the screen record icon to start recording.
- iPhone 8 and earlier: Swipe up from the bottom of the screen to access Control Center. Then, tap the screen record icon to start recording.
- iPhone SE (2nd generation): Press and hold the side button until the power off slider appears. Then, tap the screen record icon to start recording.
- iPhone SE (1st generation) and iPhone 7: Press and hold the side button until the power off slider appears. Then, swipe the screen record icon to the right to start recording.
- iPhone 6s and earlier: Press and hold the home button until the power off slider appears. Then, swipe the screen record icon to the right to start recording.
It’s important to note that not all iPhone models have the screen record feature. If your iPhone doesn’t have this feature, you can still record your screen using third-party apps.
By knowing how to use the screen record feature on your specific iPhone model, you can easily start recording your screen and take advantage of all the benefits that come with it.
How To Edit A Screen Recording On An iPhone
Here’s how to edit your screen recordings on an iPhone:
- Open the Photos app and find the screen recording you want to edit.
- Tap the screen recording to open it. Then, tap the Edit button in the top-right corner of the screen.
- Use the yellow sliders at the bottom of the screen to trim the video. Drag the sliders to the left or right to cut out the parts of the video you don’t want.
- If you want to add annotations, tap the three-dot button in the top-right corner of the screen. Then, tap Markup to access the annotation tools.
- Use the annotation tools to add text, shapes, or drawings to your video. You can also use the magnifying glass tool to highlight certain parts of the screen.
- When you’re finished editing, tap Done to save your changes. You can then choose to share your video with others via text, email, or social media.
By editing your screen recordings on your iPhone, you can make them more polished and professional-looking. Whether you’re trimming the footage or adding annotations, editing can help you create more engaging content.
How to use the screen record feature with external audio sources
I record a lot of videos for a YouTube channel that I run. One of the most often forgotten pieces of a good video is actually the audio. Truly, I have found from my experience and from the feedback of viewers, that my audio quality is actually more important than my video quality. As shocking as that may be, it is critical for you to have good audio quality.
While the screen record feature can capture audio from your iPhone’s microphone or internal speakers, you may want to use an external audio source for better quality sound.
Here’s how to use the screen record feature with external audio sources:
- Connect your iPhone to the external audio source using a cable or Bluetooth connection.
- Open Control Center and tap and hold the screen record icon.
- Tap the Microphone Audio button to turn it off. This will prevent your iPhone from recording audio from its microphone.
- Tap the Bluetooth Audio button or the AirPlay button, depending on how you’ve connected your external audio source.
- Start recording your screen as usual.
By using an external audio source with the screen record feature, you can capture high-quality sound that can make your recordings more professional and engaging. Whether you’re recording a podcast, a music performance, or a webinar, using an external audio source can help you create content that sounds great.
Related iPhone Articles
If you found this article helpful, I suggest checking out these other popular articles as recommended by our readers!
- Why can’t I receive a verification code on my iPhone?
- iPhone Swipe Up Not Working: Here’s what to do!
- How do I separate two iPhones with the same apple id?
- What Does “User Busy” on an iPhone Mean?
- iPhone hotspot keeps disconnecting?
- How to stop emails going to junk iPhone
- How To Underline Text on an iPhone [Explained!]
- How to change caller id on iPhone?
Key Takeaways from The Article
- The screen record feature on an iPhone can be used to create tutorials, capture gameplay, share moments, troubleshoot issues, and create content.
- The screen record feature has some limitations when it comes to recording, including recording and audio limitations, battery life, storage, and the availability of third-party apps.
- To use the screen record feature, swipe down from the upper-right corner of the screen (for iPhone X and later) or swipe up from the bottom of the screen (for iPhone 8 and earlier) to access Control Center and tap the screen record icon.
- Editing your screen recordings on your iPhone is easy and can be done using the Photos app.
- You can use external audio sources with the screen record feature to capture higher-quality sound.